Pages

Saturday 28 September 2013

I do like Tiramisu


Happy Birthday Tiramisu - Cake's pattern was released a year ago and being the early adopter that I am (not), I waited until winter to buy and sew it up ;)

I was heavily influenced by the masses of online reviews (mostly positive), and that regardless of their body shape, women liked wearing it ...
I really wasn't sure about the style on me though.


I was still hesitant as I traced, cut & sewed my grey version - and even more so when I tried it on and thought "'blurgh' my hips so don't need that pocket" ... It was comfortable though... and over the next few weeks, I realised I'd worn it more than any other item in my wardrobe ...


It was comfy, and it had pockets ;) It had become the outfit to reach for on early morning kindy runs and general mum days - even the Royal Melbourne Show ;)

(Check out that pattern matching on the skirt seams!)

 Details! The 30minutes a day Cake Tiramisu sewalong is highly recommended - the details can be found here: The grey fabric is a textured knit from Darn Cheap Fabrics and the red/grey stripes is a soft lightweight knit from ClearIt (The Alannah Hill/Dangerfield fabric source)
The grey version was sewn with a narrow zigzag then the seams overlocked (in red, of course).
The red version was entirely constructed on the overlocker, with the exception of the side seams which were basted first, them overlocked.

I held the red stripes in place by ironing some light fusible web in the seam allowance before overlocking the seam (Do you know the stuff? it's sold as hemming tape, but never actually holds a hem longer than the first wash?)

Neither version is hemmed ... They seem to be holding up well ;0


So, I did what I'd wanted to do from the moment I saw Cation Design's version - I made a maxi and swirled ;)


Pattern Review:
Pattern Sizing: I chose the 35A for a 34" bust (both my high and standard measurements are the same, so the A cup was the clear choice over the 30D)

Did it look like the photo/drawing on the pattern envelope once you were done sewing with it? Yes, in both versions - especially with the red stripe like the pattern picture ;)

Were the instructions easy to follow? Very - particularly if used in conjunction with the 30min a day sew along found on Cake's website

What did you particularly like or dislike about the pattern? I had some difficulty with following the fabric layout for my first version, but really appreciated the 'stripe matching lines' to get the chevrons without thinking too hard about them. And as an aside, wider stripes are more forgiving then narrow ones ;)

Fabric Used: Firstly a widthwise stretch grey cotton with a raised design, then a thin cotton blend jersey for my maxi version

Pattern alterations or any design changes you made: The grey version is straight from the pattern. For the red & grey stripes, I extended the skirt length to maxi, used narrower seams on the bodice and shifted the pockets down off my hips.

Would you sew it again? Would you recommend it to others? I've made 2 versions and will most likely make a few more in both lengths. And yes, I do recommend it to others, of all shapes and sewing levels ;)

Conclusion: A fabulous bit of comfort sewing, not unlike it's cake namesake. I do like a Tiramisu ;)

Monday 9 September 2013

Everyone needs an LBD!

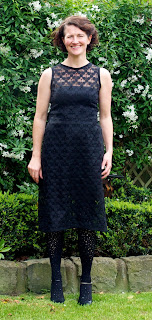
Meet my LBD - my Little Black Dress that is also my Lace Block Dream ;)


I was delighted to be invited along to a Melbourne Sewists' function of fabulousness on Saturday night - Frocktails was a gathering of several dozen incredibly talented women who all wore an amazing dress of their own making - everyone was wonderfully warm and welcoming and I admit there may have been some squealing as I met bloggers who inspire me with their makes, for the first time ;)

Thank you SO much Kat for organising the night - amazing food as well as the fabulous company.
There will be photos from the night appearing on some of the other girls blogs - The fabulous Mel Poppykettle has added us to her flickr steam, so you can find us all here.

So, what to make for an evening with such talented women.... Kat gave us plenty of notice, I RSVP'ed at the start of May!
I was very tempted by a piece of awesome emerald digitally printed chiffon silk in my stash, but couldn't bring myself to cut it - does that happen with anyone else?

The essentials for a fabulous frock IMHO involve fabulous fabric, design & fit. I decided to start with the fabulous fit and booked a session with Tessuti's SewInn.

In preparation for my class, I reread "Successful Dressmaking" from my stash of sewing texts and with new measurements, drafted a bodice block and made a muslin in some duckcloth cotton.

The lovely Vanessa was my class facilitator and she fitted my block with pins & texta markings, then supervised my transferring of these changes to my paper pattern.


I must say, I do like drawing patterns and manipulating darts is such fun - yes, I'm kind of weird like that ;)

Vanessa also walked me through how I planned to construct the dress, from placing the pattern pieces on the lace, through the order of sewing, choosing a zipper and finishing the seams.


Did I mention that the class was a mere week before Frocktails?


I'd fallen for my black lace at the Alannah Hill Clearance outlet earlier this year and wanted to make a sheath dress that I could subtly adapt with different slips underneath.

My inspiration dresses are from Dolce & Gabbana's spring 2012 collection - they have some amazing jewelled tones - and being 'old collections' can be picked up for a song - $839 rather than $2095 at Barneys New York if you're interested ;)

This is my best Scarlett pose - Peneloping and Erin of IHeartFabric are hosting a CopyCat Challenge2 until 30th Sept and this is my entry ;)


Armed with my freshly drafted block pattern, I laid out my pieces and cut my lace - with newly sharpened scissors for a change - Winter has seen me almost exclusively using rotary cutters for knits and silks.
I had forgotten how lovely sharp scissors and woven fabrics were ;)

The dachshund did his usual pattern weight impersonation and escaped unscathed.

I loaned mum's more modern machine to insert my invisible zip, with a foot that fitted! Yay! Unfortunately, in my excitement of having such modern niceties, I forgot to stabilise the seam... My impersonation of a ridgebacked lizard was salvaged with some unpicking, much steaming and stabilising the seam - lesson learnt.

The next lesson learnt was that black polyester thread on black lace is next to impossible to unpick, even with head lamps and sunlight... Ask me how I know... Go on... ;) - two front skirt darts, somehow they didn't line up with my bodice darts, sigh.. After unpicking both of them and part of the zip, I changed to a very dark green thread in my bobbin - almost undetectable, but enough to spot in the lace, which I do admit, was quite forgiving of being unpicked; if I hadn't cut any actual fabric threads.

I faced the neckline, hem and armholes with bias binding using Grainline studio's pictorial here. I like the design feature of the black banded edges with the lace and dress shape.

The inside seams aren't french, rather they're narrowly overlocked. I did have lovely inch wide seams, but I'm not going to need to adjust them again... right?

I love this dress, it's turned out as I imagined and is versatile enough to get a lot of wear. Best of all, I now have a block pattern that works for me - so bring on some spring sewing!